Tip #1: Learn from the Pros
 I always thought “there is no possible way for me to improve my food photography until I invest in an expensive DSLR camera” but nothing could be further from the truth – thanks to Tasty Food Photography!
After reading the awesome guide, I dared to start using the manual settings of my point-and-shoot camera, learnt tons about composition and setup, and – best of all – I am finally not afraid to edit my pictures in Photoshop (all the different options used to overwhelm me like crazy).
If you are into food photography and are not yet a pro, this guide (ebook) is a must and well worth every penny in my opinion! After reading it, my pictures even started to get accepted on some of the big food image sharing sites – which results in increased traffic to my site.
Tip #2: Invest in a DSLR
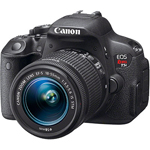
Up until just recently, all I used to take my pictures with was a cheap point and shoot digital camera we were given as a wedding gift some years back. It was not a bad little camera – until I broke it a few weeks ago – at which point my husband and I decided to take the plunge and finally get my dream camera – the Rebel T5i (known as the Canon EOS 700D in some countries).
It took a bit of getting used to at first, but boy – what a difference. There is so much more depth to my pictures – I smile every time I use it!
Unless you have a budget for it, you don’t need a DSLR to start out with – but I will say it makes food photography a whole lot more fun and easier too. My Canon T5i was definitely one of the best investments I have ever made!
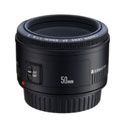
 The second best investment for better photos is a great lens. On suggestion of more experienced food bloggers, I skipped the kit lens for the Rebel T5i and got the body-only version. With that I purchased a Canon EF 50mm f/1.8 II lens. This is an affordable macro lens that is perfect for food (or other still) photography. It enables you to take wonderfully crisp close-up shots with awesome bokeh (that blurry background).
I haven’t looked back since investing in my DSLR camera (with this lens). Previously – for example – when submitting photos to the big food image sharing sites, maybe 1 out of 6 submitted photos would get accepted. That is a lot of hard work going to waste. So far none of my images – taken with the new camera + lens – have been rejected!
Worth it? Heck yeah!
Tip #3: Stay Organized!
Pictures take up a lot of storage space on a hard drive. To free up this space on a computer or laptop, it is a good idea to use an external hard drive. It’s also a great device to store backups of other important files.
Computers are not perfect. They do crash, usually in the most inconvenient situations. Regularly backing up my pictures has saved me a ton of heart and head ache.
The one I have has 1 terabyte of storage space (which is plenty) and is small/light enough to take with me where-ever I go.

